Students learn table-setting conventions and manners while practicing prepositions next to, between, above and below. You can also use to the left / right of.
Vocabulary targets include knife, fork, spoon, napkin, dinner plate, dessert, bowl, glass (drinking glass), set (Set the x next to the y), set the table, pass.
Oh – and they make a placemat that can be used for Part Two – Thanksgiving Foods!
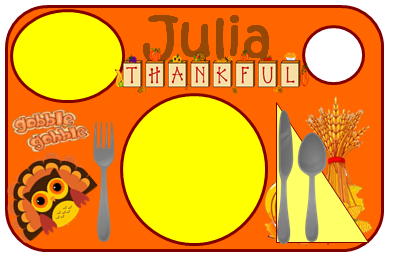
Top left to right: dessert plate, glass, fork, dinner plate, napkin, knife and spoon. Insert appropriate prepositions!
Gather What You Need:
Paper, Pre-Cut Shapes, Bowls, Markers, Glue Sticks, Thanksgiving stickers (optional)
For placemats, I use 12 x 18 construction paper (the large size). Students choose orange, yellow, red or brown – autumn colors. Of course, the kids glue each piece of the place setting onto the construction paper (glue stick b/c it will be laminated). But there’s so much more to the lesson than that.
Each of the pre-cut shapes above (except the name) is put into its own bowl; so that’s 7 bowls. The desks are put together like a dining room table around which students are seated. The bowls and glue sticks (fewer glue sticks than needed, to require students to ask for them to be passed) are scattered around the center of the table.
The Lesson
Predict Family Plans
I start by talking about what they think will happen at their family’s Thanksgiving celebration.
Experience has taught me that it’s helpful to get some information from the families (names, relationships, etc.) before this discussion. Sadly, kids usually return from the holiday break talking about ‘boys’ and ‘girls’ whose names and relationships they don’t know. They don’t know where (whose house) they spent Thanksgiving. And they can’t name the foods that were served.
Where did you go for Thanksgiving? Who did you see? What did you eat?

I send this form home as homework on Monday the week of the lesson. It requires minimal effort because writing is limited. I often send it with a page of vocabulary pictures of the food items, depending on the family’s needs. Return rate for this paper has been as low as 0 for 4 kids. (sigh)
Discuss Manners
Next, we talk about manners. Manners are rules about being polite and are very important for special occasions. And Thanksgiving is one of the most special of all occasions! Here are my basics.
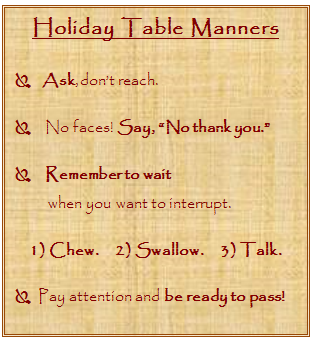
Review Manners + Vocabulary
After reading ‘be ready to pass!”, I show my pre-made sample placemat and check everyone’s familiarity with the vocabulary.
We talk about “setting the table” and whose job that is. What are some other things you can do to help get ready for the meal?
We discuss where everything goes on the placemat. This is where we practice those prepositions.
Then I explain that, like we do at Thanksgiving dinner, we will pass each bowl around the table, right to left. (Teacher turns back to students, models right arm): Everyone raise your right arm!! (looking around) Other arm… Now point to the left (demonstrate). — Or however you want to model right to left.
… and Action!
As happens at large family dinners, we always end up with ‘log jams’ as some take longer to get what they need. And there are often a couple of kids who think it’s a race to see who can pass the fastest. We deal with each event as it occurs, just as we do during a meal.
When everyone has what they need, they are ready to glue everything into place.We talk about “Ask, don’t reach,” and why it’s a good rule. Then discuss the ways to ask for something you want: “Please pass the milk – I mean glue.” “Could you pass the glue please?”
For kids with poor memory, I have written those sentences along with some vocabulary on the placemat, hoping that the family would also practice at home!
Add the Finishing Touches
Wrap it up as each child writes their name on their placemat. Add stickers if you’d like. Then review the manners and tell them that the following day you will add some food to your placemats!
This whole lesson will take about an hour, depending on how many students you have and how talkative they are, of course!
Extend this Experience
Practice food names and manners (“Please pass the peas”).
Create a representation of common Thanksgiving foods and fill your bowls. Be sure to make enough for seconds and/or leftovers if those are targets. Don’t forget butter and gravy for the mashed potatoes and corn! And be sure to include a dessert (with whipped cream). I’ve used a wide variety of simulations:
- cut-out construction paper – gray turkey legs or turkey slices, white cloud-like mashed potatoes, hole-punch circle red cranberries or green peas, etc.
- photos from grocery fliers or web image search – cut out and color copied
- 3D (can’t laminate) – cotton or tissue paper mashed potatoes, red bead cranberries, etc.
You can practice additional language like, “Would you like…?”, “No thank you,” “Do you like…?”, etc.
Remember to have fun!
Read More about Experience Stories and How to Use Them